Anticogging
Warning
This is an experimental feature. It has not yet been tested with a wide range of motors or ODrive settings. You are encouraged to reach out to us and tell us how it goes, especially if you run into problems.
Overview
When turning a BLDC motor by hand, one can usually feel a bit of “bumpiness”. This is called “cogging torque” and stems from the internal magnet and stator geometry.
Anticogging refers to an algorithm that runs on the motor controller and actively cancels out the motor’s cogging torque in order to get smoother, more accurate motion control.
ODrive’s anticogging algorithm works by first running a one-time calibration that measures the cogging torque map of the motor. This map is then used to add a position-dependent feedforward term to the torque command generated by the controller.
Preparation
Start by configuring the controller in the GUI or odrivetool, such that it can spin the motor in velocity control mode.
Make sure the velocity gain is tuned to a level where it doesn’t vibrate or oscillate. You can do this either in the GUI’s Dashboard, or in
odrivetoolby settingodrv0.axis0.controller.config.vel_gain.Additionally, you’ll need to configure a Position Reference Frame which does not shift between reboots (except by integer turn counts).
These modes are suitable for anticogging:
Absolute Encoder Reference Frame
Index-based Reference Frame
Custom User Reference Frame, if the condition above holds.
A valid implementation would be to set
odrv0.axis0.pos_estimate = angleon every start, whereangleis the current angle of the axis. For example if you’re using the onboard encoder:odrv0.axis0.pos_estimate = odrv0.onboard_encoder0.raw. If you’re using an AMT21 encoder:odrv0.axis0.pos_estimate = odrv0.rs485_encoder_group0.raw.These modes are not suitable for anticogging:
Startup-Relative Reference Frame: Not suitable because the reference frame shifts arbitrarily between reboots.
Homed Reference Frame: Not recommended because homing switches are often not precise enough. Compatibility between homing and anticogging will be improved in a future update.
Note
<axis>.controller.config.circular_setpoint_range must be kept at the default of 1. This limitation will be removed in future versions.
How to enable anticogging
Configure your ODrive according to the preparation instructions above.
Configure the anticogging parameters. See
herefor a full list or parameters and their descriptions.Below you can find examples for some selected motors. If you’re using a different motor, you can use these values as an orientation.
odrv0.axis0.controller.config.vel_gain= 0.5odrv0.axis0.config.anticogging.max_torque= 0.15odrv0.axis0.config.anticogging.calib_start_vel= 0.5odrv0.axis0.config.anticogging.calib_end_vel= 0.15odrv0.axis0.config.anticogging.calib_coarse_integrator_gain= 10Run the calibration:
odrv0.axis0.requested_state = AxisState.ANTICOGGING_CALIBRATION. The calibration takes six minutes by default. The motor will start by spinning moderately fast, then slow down, and then do the same in the other direction. During this time it iteratively builds a map of the motor’s cogging torque. The motor should not come to a stop during the calibration even for an instant. If it does, you need to tweak the parameters and try again.After the calibration has completed, enable anticogging:
odrv0.axis0.config.anticogging.enabled = True.Save the calibrated torque map and configuration changes:
odrv0.save_configuration()
For more details, including customization options, refer to the API reference for ODrive.AnticoggingConfig.
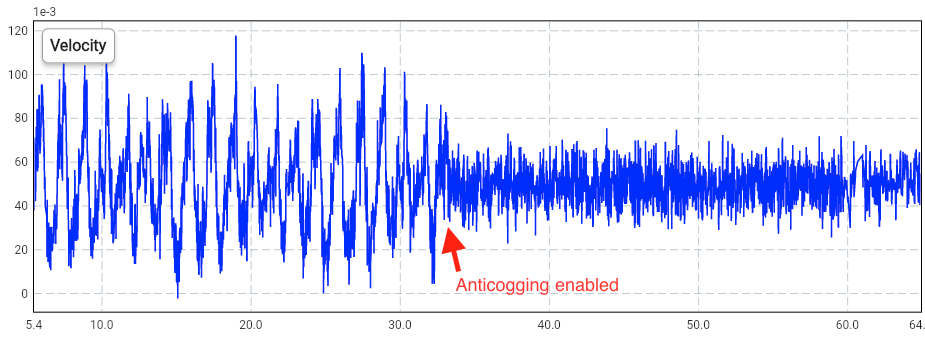
Anticogging on a D5312s with a velocity setpoint of 0.05 rev/s.
Limitations
While anticogging does the best it can to cancel out the cogging torque, it is not perfect. It introduces a feedforward term in the controller which depends on the position estimate, which itself can be delayed or inaccurate. Thereby it can reduce stability margins for your system and require you to tune down gains to be less aggressive.
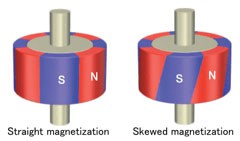
Therefore, if you find anticogging to give unsatisfactory results for your application, consider selecting a motor that is specifically designed for low cogging torque. Such motors are typically recognized by their skewed magnet or stator arrangement.
Known issues
Writing to
controller.configduring an ongoing calibration causes undefined behavior.