BotWheel Explorer
Overview
The BotWheel Explorer is a demonstration platform to show how to build simple full stack robot powered by ODrives that are connected to a single board computer via CAN bus.
A simple remote control web app is included so you can control the robot via Wi-Fi from your Smartphone or Laptop.
Warning
For the sake of simplicity, Wi-Fi and an unsecure HTTP connection is used. If you plan to do more serious things with it, please make sure to use a connection method that meets your reliability and security requirements.
Hardware & Electrical Build
Please see our hardware build guide.
Electrical Schematic
Please see the wiring schematic section of the hardware build guide.
ODrive Configuration
In this section, we will configure the two ODrives so they are ready to spin the wheels and communicate on CAN. The instructions below need to be followed twice: once for the left wheel and once for the right wheel.
Make sure to lay the robot upside down so the wheels can spin freely in the air (a cardboard box is recommended, so the robot isn’t laying on the E-Stop switch).
Note
Ensure the E-Stop switch isn’t pressed, or the ODrives will be unpowered and calibration will fail.
Connect the ODrive to your computer using a USB cable.
Ensure your firmware is updated to the latest version Firmware Update
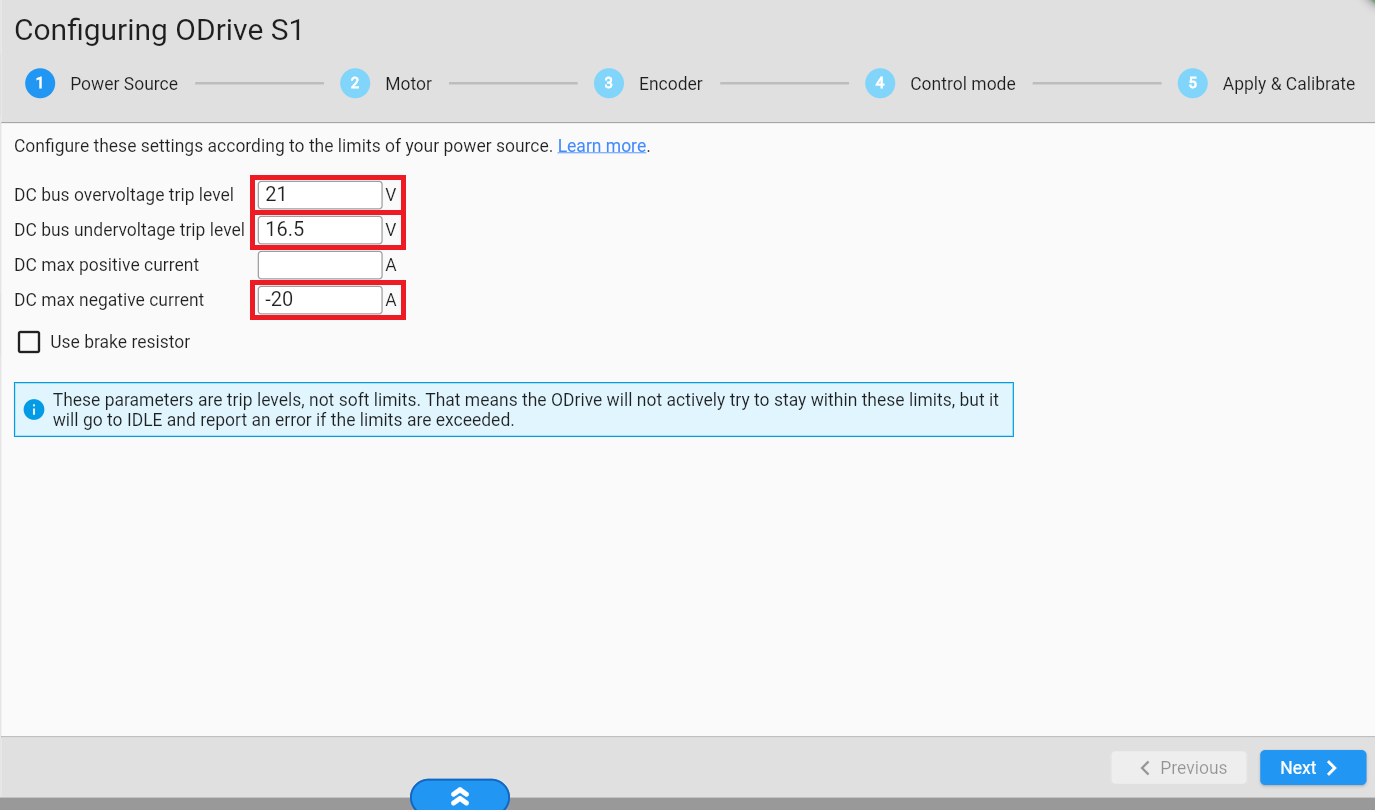
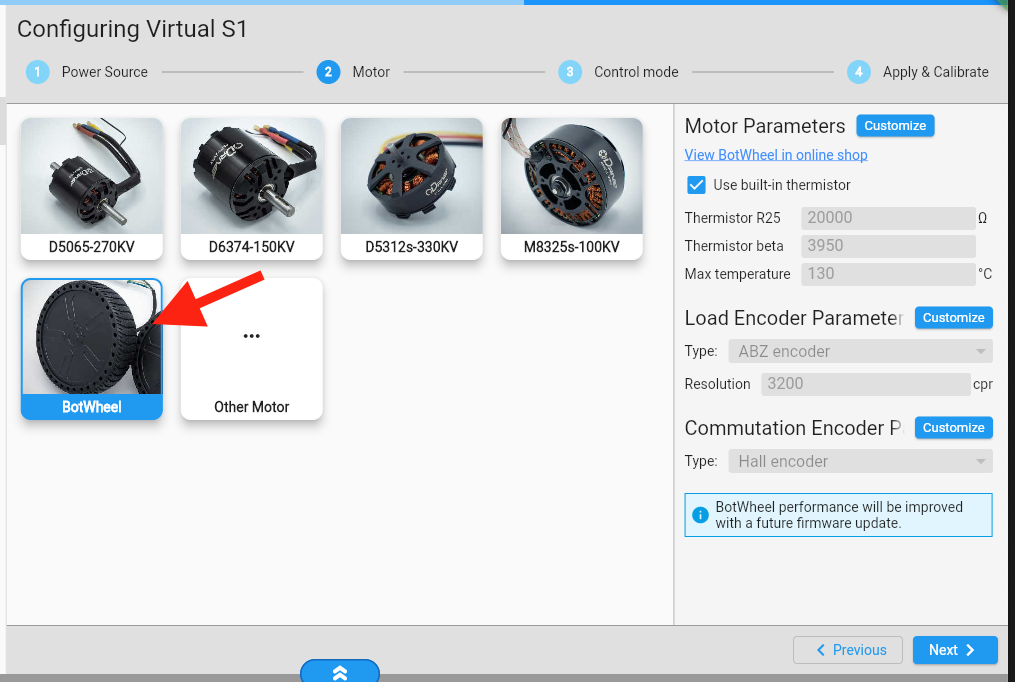
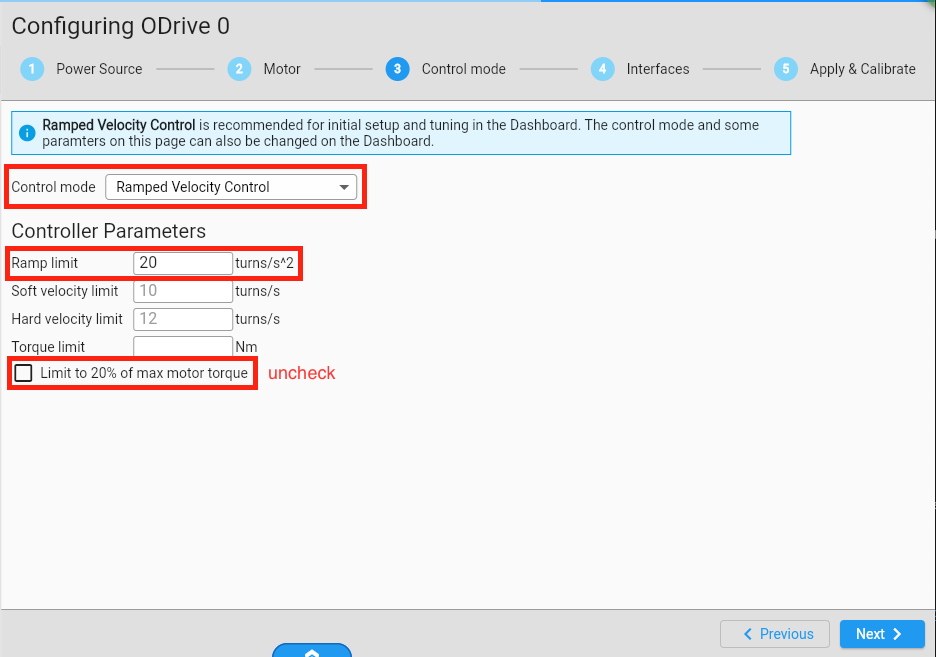
Go to https://gui.odriverobotics.com/configuration and configure the ODrive according to the screenshots.
All important settings are marked red in the screenshots. You can leave all other values at their default (some fields will be left empty or at their prefilled suggested value.).
On the Interfaces page, set the Node ID to 0 for the left ODrive and to 1 for the right ODrive.
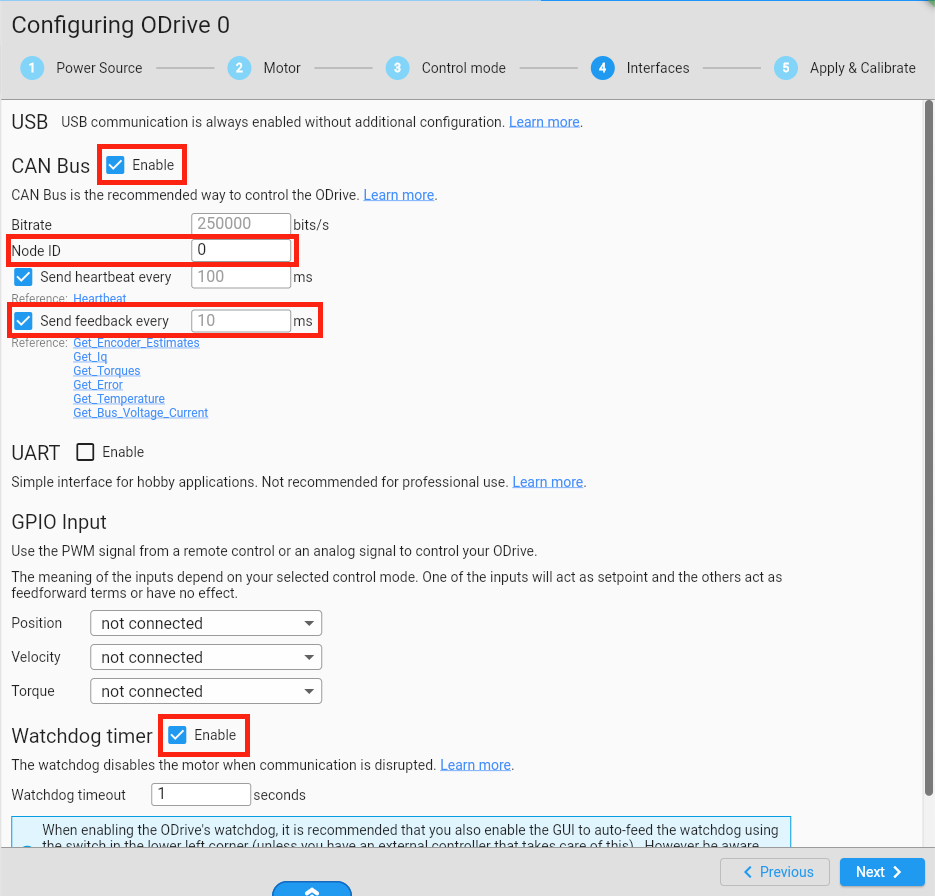
Make sure to enable the GUI’s watchdog feeder (expand the bottom bar to reveal this switch). Later, when we run the robot, the Raspberry Pi will take over this task.
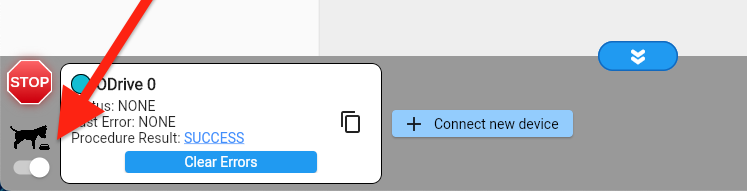
On the last wizard page, click all action buttons in order.
You can ignore the “What’s next” step in the GUI and come back to this guide instead.

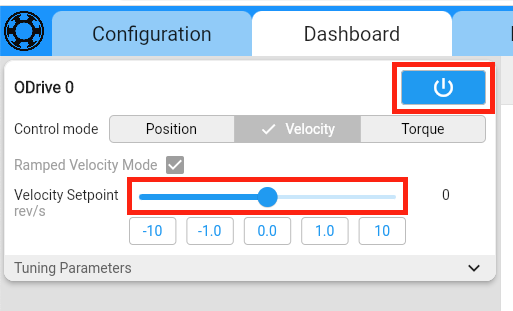
Finally, we verify that the ODrive is configured correctly and can spin the wheel. Connect the battery to the ODrive. Go to the Dashboard and click on the Power button (you may need to click “Clear Errors” first). When you drag the velocity slider, the wheel should start spinning with the commanded velocity.
The ODrive is now ready! You can now disconnect USB. Repeat all steps with the second ODrive, and then move on to the Raspberry Pi setup.
Raspberry Pi Setup
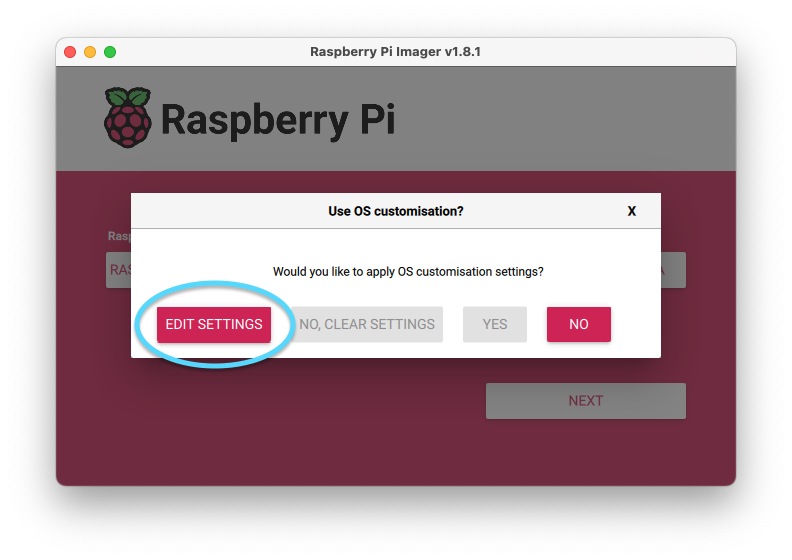
Install an operating system on your Raspberry Pi’s SD card. You can use the Raspberry Pi Imager for this. We recommend the following settings:
Operating System: Raspberry Pi OS (other) > Raspberry Pi OS Lite (64-bit)
After pressing “NEXT”, press “EDIT SETTINGS”
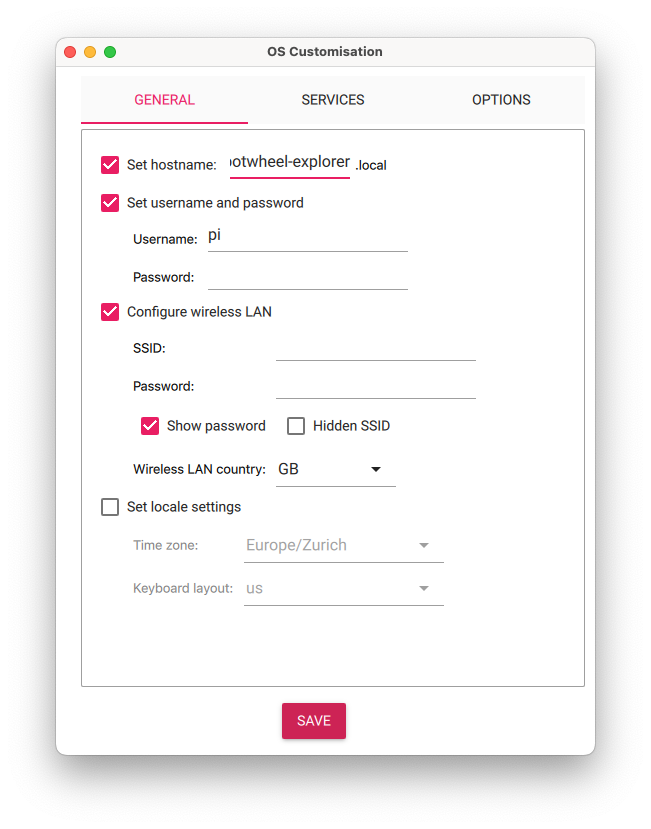
In the GENERAL tab:
Hostname: botwheel-explorer.local
Username: pi
Password: (your choice, make sure to remember it)
Configure wireless LAN
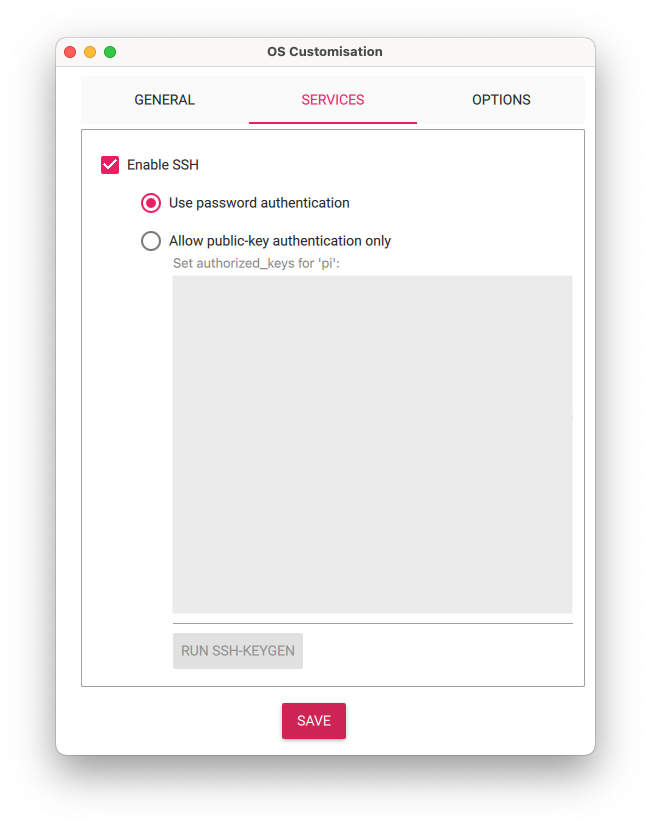
In the SERVICES tab: Enable SSH and use password authentication (unless you’re already familiar with public-key authentication).
If you’re an advanced user, feel free to use the settings that are best for you.
After writing the image to the SD card, insert it into the Raspberry Pi and power it up. It should automatically join your Wi-Fi network.
On your main computer, log into your Raspberry Pi remotely via SSH.
ssh pi@botwheel-explorer.localAll subsequent instructions are meant to be run via SSH on the Raspberry Pi.
Enable the CAN hat:
Open the
/boot/firmware/config.txtwithsudo nano /boot/firmware/config.txt
At the bottom of the file, add the following:
dtparam=spi=on
dtoverlay=spi1-3cs
dtoverlay=mcp251xfd,spi0-0,oscillator=40000000,interrupt=25 # configure can0 interface
dtoverlay=mcp251xfd,spi1-0,oscillator=40000000,interrupt=24 # configure can1 interface
Reboot the device for these changes to take effect.
sudo rebootInstall dependancies:
sudo apt -y install git can-utils python3-can python3-websockets python3-qrcode
Clone the repository that contains the control script:
git clone https://github.com/odriverobotics/ODriveResources.git
Running the example
This section assumes you’re still logged into the Raspberry Pi via SSH.
When the Raspberry Pi starts up, the CAN interface is down by default. Bring it up with this command:
sudo ip link set can0 up type can bitrate 250000
Launch the control script:
python3 ODriveResources/botwheel-explorer/bot_ctrl.pyAdvanced Options
Serve the webpage and websocket over SSL using a self-signed certificate:
python3 ODriveResources/botwheel-explorer/bot_ctrl.py --ssl
When you connect with your browser it will complain because the certificate is self-signed and therefore provides a false sense of security. Press “Advanced” and “Proceed to site” to ignore the warning.
Use a different CAN interface:
python3 ODriveResources/botwheel-explorer/bot_ctrl.py --can can1
Ignore one ODrive for testing:
python3 ODriveResources/botwheel-explorer/bot_ctrl.py --ignore right
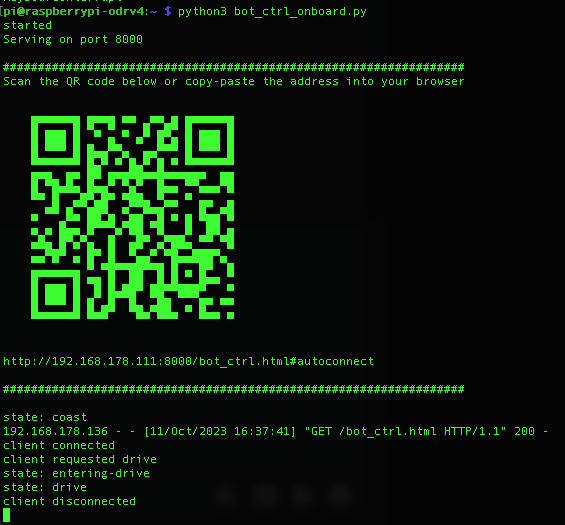
The control script will show a QR code in the terminal. You can scan this with your phone or copy & paste the address into the browser address bar on your computer. The address points to a webpage that serves as a remote control for the robot. Note that your remote control (phone or computer) must be in the same network.
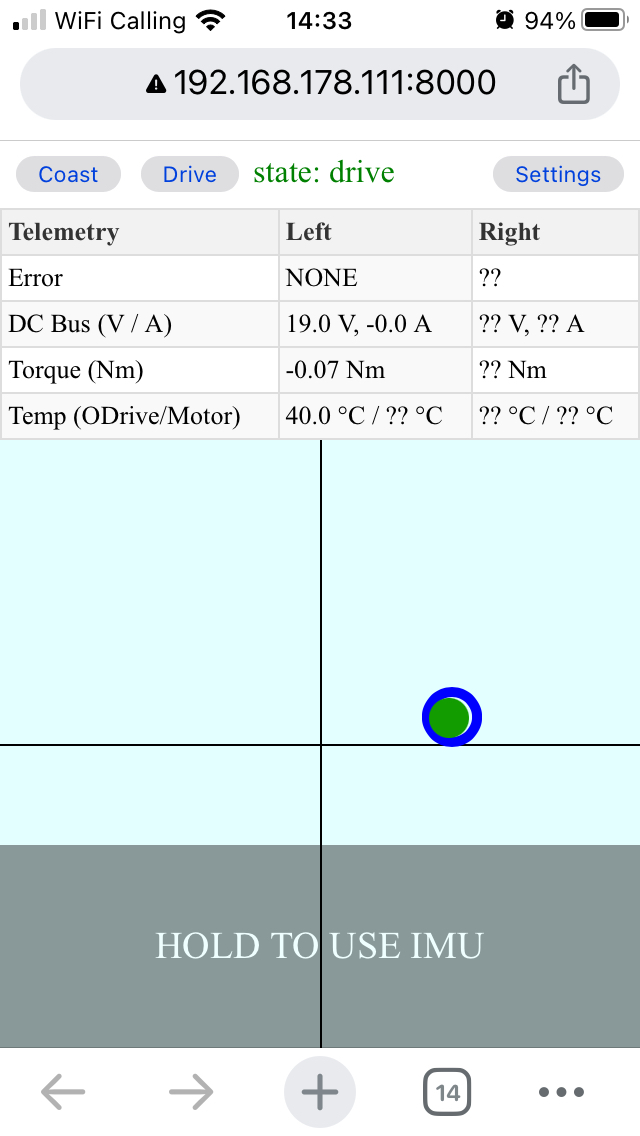
On the remote control page, press “Drive”
You can now use your mouse/touch, keyboard, joystick or IMU (on a smartphone) to drive the robot around. Press “Settings” for more info.
The blue circle indicates the commanded velocity and turn rate. The green ball indicates the actual velocity and turn rate, based on the actual velocity feedback from BotWheels.
Note
To enable IMU support, some browsers require the page to be served over an encrypted (SSL) connection. See step 2 for details.
Running the example on startup
After initial testing (section above), you probably want the control script
bot_ctrl.py to start automatically when you power up the robot.
To achieve this, run the following commands on the Raspberry Pi:
sudo cp ODriveResources/botwheel-explorer/bot_ctrl.service /etc/systemd/system/
sudo systemctl daemon-reload
sudo systemctl enable bot_ctrl.service
sudo systemctl start bot_ctrl.service
Note
Open bot_ctrl.service in a file editor to see if the arguments are right for you.
This will create a systemd service for the control script, enable it to start on system start, and also start it right away. If the script exits for any reason, systemd will restart it.
To view the connection URL and QR code:
sudo journalctl -xe
To view the status and the most recent log output, run
sudo systemctl status bot_ctrl.service
Next Steps
Edit the onboard control script (
ODriveResources/botwheel-explorer/bot_ctrl.py) and the remote control web app (ODriveResources/botwheel-explorer/bot_ctrl.html) to customize it to your liking.Add more ODrives to the CAN bus, for example an end effector on top of the platform.
Check out the ROS2 CAN Package if you want to control the ODrives from ROS2.
Troubleshooting
Remote Control Web App shows “state: waiting-for-odrives”.
The Raspberry Pi doesn’t receive CAN heartbeats from one or both ODrives.
Make sure the battery is plugged in for CAN communication to work. Both ODrive LEDs should be cyan.
Double-check all CAN bus connections.
Make sure you have set
node_idaccording to ODrive Configuration (0 on the left and 1 on the right ODrive).
Remote Control Web App shows “disconnected”.
Press “Settings > Connect” or reload the page to reconnect. If this keeps happening, your Wi-Fi connection might be too unstable. Try operating closer to your Wi-Fi access point.
OSError: [Errno 98] Address already in usewhen starting bot_ctrl.pyFull Error Message
Traceback (most recent call last):
File "/home/pi/ODriveResources/botwheel-explorer/bot_ctrl.py", line 455, in <module>
   asyncio.run(main())
File "/usr/lib/python3.11/asyncio/runners.py", line 190, in run
   return runner.run(main)
         ^^^^^^^^^^^^^^^^
File "/usr/lib/python3.11/asyncio/runners.py", line 118, in run
   return self._loop.run_until_complete(task)
         ^^^^^^^^^^^^^^^^^^^^^^^^^^^^^^^^^^^
File "/usr/lib/python3.11/asyncio/base_events.py", line 653, in run_until_complete
   return future.result()
         ^^^^^^^^^^^^^^^
File "/home/pi/ODriveResources/botwheel-explorer/bot_ctrl.py", line 431, in main
   with socketserver.TCPServer(("", HTTP_PORT), MyRequestHandler) as httpd:
         ^^^^^^^^^^^^^^^^^^^^^^^^^^^^^^^^^^^^^^^^^^^^^^^^^^^^^^^^^
File "/usr/lib/python3.11/socketserver.py", line 456, in __init__
   self.server_bind()
File "/usr/lib/python3.11/socketserver.py", line 472, in server_bind
   self.socket.bind(self.server_address)
OSError: [Errno 98] Address already in use
This can happen when you just quit the script before. You may have to wait briefly for the system to clean up old connection resources. Try again after one minute.
It can also mean that the script is already running. Check with
sudo systemctl status bot_ctrl.serviceif it’s running as a service. Also make sure you have no other Terminal tabs open where the script is running.can.exceptions.CanOperationError: Error receiving: Network is down [Error Code 100]when starting bot_ctrl.pyFull Error Message
Traceback (most recent call last):
File "/usr/lib/python3/dist-packages/can/interfaces/socketcan/socketcan.py", line 536, in capture_message
   cf, ancillary_data, msg_flags, addr = sock.recvmsg(
                                          ^^^^^^^^^^^^^
OSError: [Errno 100] Network is down

During handling of the above exception, another exception occurred:

Traceback (most recent call last):
File "/home/pi/ODriveResources/botwheel-explorer/bot_ctrl.py", line 455, in <module>
   asyncio.run(main())
File "/usr/lib/python3.11/asyncio/runners.py", line 190, in run
   return runner.run(main)
         ^^^^^^^^^^^^^^^^
File "/usr/lib/python3.11/asyncio/runners.py", line 118, in run
   return self._loop.run_until_complete(task)
         ^^^^^^^^^^^^^^^^^^^^^^^^^^^^^^^^^^^
File "/usr/lib/python3.11/asyncio/base_events.py", line 653, in run_until_complete
   return future.result()
         ^^^^^^^^^^^^^^^
File "/home/pi/ODriveResources/botwheel-explorer/bot_ctrl.py", line 420, in main
   while not (bus.recv(timeout=0) is None): pass
               ^^^^^^^^^^^^^^^^^^^
File "/usr/lib/python3/dist-packages/can/bus.py", line 98, in recv
   msg, already_filtered = self._recv_internal(timeout=time_left)
                           ^^^^^^^^^^^^^^^^^^^^^^^^^^^^^^^^^^^^^^
File "/usr/lib/python3/dist-packages/can/interfaces/socketcan/socketcan.py", line 736, in _recv_internal
   msg = capture_message(self.socket, get_channel)
         ^^^^^^^^^^^^^^^^^^^^^^^^^^^^^^^^^^^^^^^^^
File "/usr/lib/python3/dist-packages/can/interfaces/socketcan/socketcan.py", line 544, in capture_message
   raise can.CanOperationError(f"Error receiving: {error.strerror}", error.errno)
can.exceptions.CanOperationError: Error receiving: Network is down [Error Code 100]
The CAN interface is not started. Re-run the command
sudo ip link set can0 up type can bitrate 250000.