ROS2 CAN Package
This page gives a high level overview how to control an ODrive from ROS2 via CAN bus. The ROS2 packages and their technical reference can be found on GitHub.
This documentation assumes a basic understanding of ROS2 concepts, workspaces, and tools. For a refresher on these topics, you can find the ROS2 documentation here.
Setting Up the ODrive
First, configure the ODrive such that it can spin a motor and communicate over CAN. This process is largely independent of ROS2 and described in more detail in these guides:
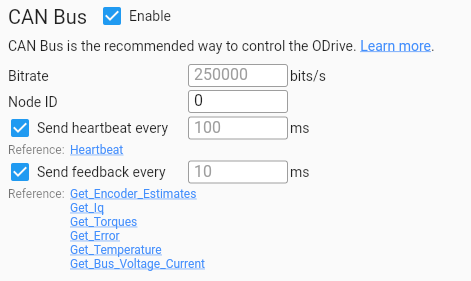
Using the Web GUI (Configuration > Interfaces), assign a unique node ID to each ODrive on the bus and enable feedback messages according to the screenshot below:

Verify these messages are working properly with:
candump can0 -xct z -n 10, orpython3 -m can.viewer -c "can0" -i "socketcan".
Installing the ros_odrive Package
Clone the official ros_odrive repository into the src folder of your ROS2 workspace.
Navigate to the top level of the ROS2 workspace folder and run;
colcon build --packages-select odrive_can
Source the workspace:
source ./install/setup.bash
Run the example launch file:
ros2 launch odrive_can example_launch.yaml
You should now have a ROS node running that is ready to relay commands and telemetry between other ROS nodes and the ODrive.
Hint
This example assumes the axis node_id is 0, and the CAN network interface is “can0”. These expected values can be changed in ./launch/example_launch.yaml
Inspection
Note
The following commands assume the odrive_can_node is within the namespace odrive_axis0 (set in ./launch/example_launch.yaml).
Once the node is running you can verify everything is setup correctly by running some basic ROS commands in another terminal:
Source the workspace (this needs to be done each time you open a new terminal session):
source ./install/setup.bash
Show feedback from the ODrive:
ros2 topic echo /odrive_axis0/controller_status
ros2 topic echo /odrive_axis0/odrive_status
Request a new state. For example to request
CLOSED_LOOP_CONTROL(8):ros2 service call /odrive_axis0/request_axis_state odrive_can/srv/AxisState "{axis_requested_state: 8}"
Full list of
axis_requested_statecodes:AxisStateSend setpoints. For example this command requests a velocity of 1.0 turns/s in velocity ramp mode:
ros2 topic pub /odrive_axis0/control_message odrive_can/msg/ControlMessage "{control_mode: 2, input_mode: 1, input_pos: 0.0, input_vel: 1.0, input_torque: 0.0}"
Full list of
control_modecodes:ControlModeFull list of
input_modecodes:InputMode