Legacy Firmware Update
Note
This DFU system is deprecated. The new DFU system is documented here.
This page guides you through the process of updating the ODrive to the newest firmware using the legacy DFU system.
Warning
Your configuration will be erased during a firmware update. See Configuration Backup if you want to keep it.
Make sure you have odrivetool installed.
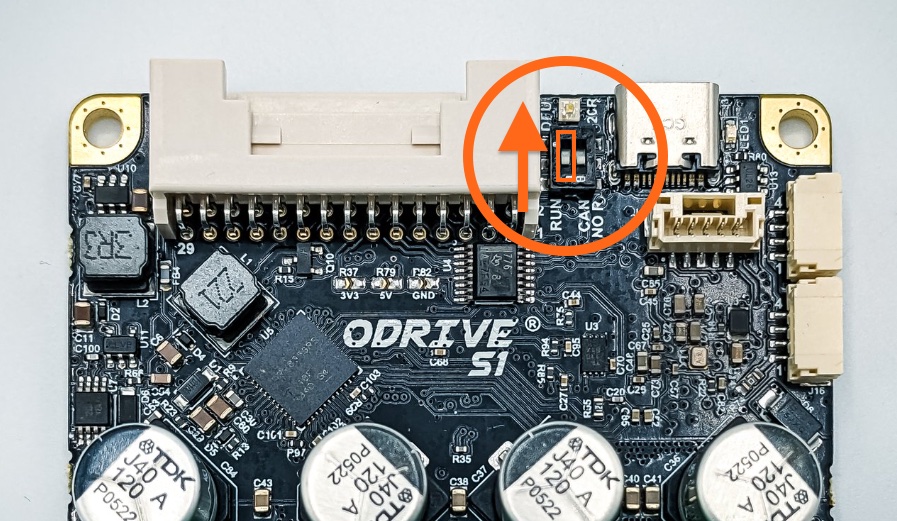
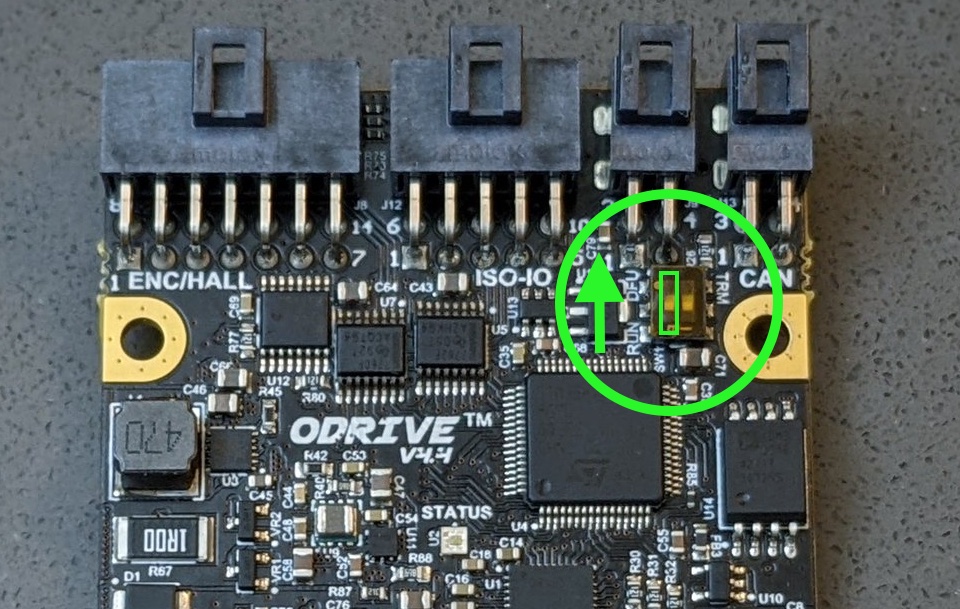
Put your ODrive into DFU mode. To do this, put the DFU switch into the “DFU” position, as indicated on the image below. Then power-cycle the ODrive.


This step is mandatory if your current firmware version is 0.6.5 or 0.6.6, or if the previous update attempt failed. In other cases it is optional but can help to reduce room for errors.
Open up a terminal and run the following command:
odrivetool legacy-dfuThis will wait for an ODrive to be connected and then check online for the latest stable firmware release for your ODrive version.
You may see one or more prompts which you can confirm by typing y and Enter.
Below is an example output of
odrivetool legacy-dfu. Your exact output may differ depending on various factors.ODrive control utility v0.6.7 Waiting for ODrive... Hardware version detection not yet supported for this ODrive. Is this an ODrive S1? [y/N] y Checking online for latest ODrive S1 firmware on channel master... Found compatible firmware (0.6.7). Install now? [Y/n] Y Downloading firmware... The device may have user configuration that will be lost after the firmware upgrade. If you want to back this up please run `odrivetool backup-config` first. Do you want to continue anyway? [Y/n] Y Erasing... done Flashing... done Verifying... done Firmware upload successful. To complete the firmware update, set the DFU switch to "RUN" and power cycle the board.
Put the DFU switch back to its original position and power-cycle the ODrive.
Other Options
Install firmware from our semi-stable development channel:
odrivetool legacy-dfu --channel develInstall a specific firmware version (0.6.7 in this example):
odrivetool legacy-dfu --version 0.6.7Install a local firmware file:
odrivetool legacy-dfu firmware.elfYou can manually download firmware files from here.
Warning
Make sure the selected firmware file matches your hardware version! There are no checks in place to prevent you from installing incompatible firmware.
Troubleshooting
In some (but not all) cases it is necessary to force the ODrive into DFU mode before running
odrivetool legacy-dfuorodrivetool install-bootloader. See step 2 above for details.On some machines you will need to unplug and plug back in the USB cable to make the PC understand that we switched from regular mode to bootloader mode.
odrivetool legacy-dfuorodrivetool install-bootloaderfails with something likeerror: argument command: invalid choice: 'legacy-dfu':Make the System Requirements are met.
Make sure you have the latest version of
odrivetool:python3 -m pip install --upgrade odrive.
Operating System specific issues:
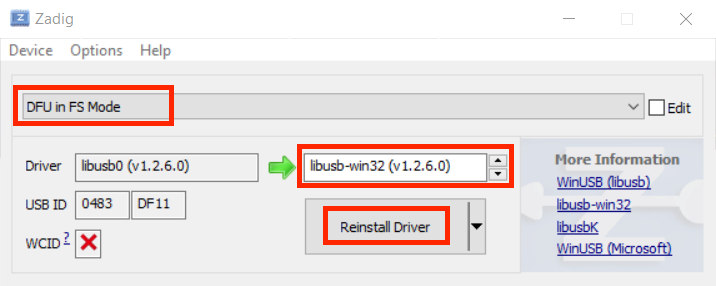
You may need to tell Windows to use the correct driver for the ODrive in DFU mode. Download and open the Zadig utility. In the device list, select “DFU in FS Mode” and select the driver “libusb-win32”. Then click “(Re)Install Driver”.

Warning
Do not use Zadig on an ODrive that is in RUN mode (this would show up as “Native Interface” in Zadig).
If you’ve used Zadig on an ODrive in RUN mode before (for instance when migrating from ODrive v3.x), it may be necessary to remove any/all drivers installed with Zadig utility. Detailed instructions can be found here.
Try running
sudo odrivetool legacy-dfuinstead ofodrivetool legacy-dfu.On some machines you will need to unplug and plug back in the USB cable to make the PC understand that we switched from regular mode to bootloader mode.
If the DFU script can’t find the device, try forcing it into DFU mode.
If you see the error
usb.core.NoBackendError: No backend available, you probably forgot to install libusb when installing odrivetool. You can fix this by running:brew install libusb
Further debugging:
Does
/opt/homebrew/lib/libusb-1.0.0.dylib(Apple Silicon Macs) or/usr/local/lib/libusb-1.0.0.dylib(Intel Macs) exist? Is it readable?Does PyUSB find the library? Check by running:
PYUSB_DEBUG=debug python3 -c 'import usb.core; usb.core.find()'
On a functioning installation, this should print:
DEBUG:usb.backend.libusb1:_LibUSB.__init__(<CDLL '/opt/homebrew/lib/libusb-1.0.dylib', handle 8b580180 at 0x1027173b0>)
If the library exists but Python doesn’t find it, you may need to trace
usb.libloader.load_locate_library()(in[python dir]/site-packages/usb/libloader.py) to see which paths it’s checking.
Flashing with an STLink
Warning
This section describes a low-level method to update the firmware on the ODrive. As a normal user you don’t need to worry about this.
This procedure requires an STLink/v2 or compatible programmer.
- Install OpenOCD
Windows: instructions (also follow the instructions on the ST-LINK/V2 drivers)
Linux:
sudo apt-get install openocdmacOS:
brew install openocd
Download the latest firmware release form here. You will need the
.elffile. Make sure you select the file that matches your board version.Wire up an STLink/v2 programmer to the Debug IO connector (Pro, S1) and power up the ODrive.
Open up a terminal and navigate to the directory where the firmware is.
Run the following command (replace
ODriveFirmware_v3.4-24V.elfwith the name of your firmware file):openocd -f interface/stlink-v2.cfg -f target/stm32h7x.cfg -c init -c "reset halt" -c "flash write_image erase firmware.elf" -c "reset run" -c exit
If everything worked correctly, you should see something similar to this towards the end of the printout:
wrote 393456 bytes from file firmware.elf in 5.475442s (70.174 KiB/s)
If something doesn’t work, make sure
openocdis in yourPATHvariable, check that the wires are connected properly and try again with elevated privileges.