odrivetool
odrivetool is the command line tool accompanying the ODrive. Its main purpose is to provide an interactive shell
to control the device using text-based input, as well as some supporting functions like firmware update.
If you prefer a graphical user interface instead, consider using the Web GUI.
System Requirements
⇒ See Python Package
Installation
Install Python 3: Download the installer for Latest Python 3 Release from here. Execute the downloaded file and follow the instructions. In the installer, make sure to check “Add python.exe to PATH”.
Launch the command prompt: In the start menu, type
cmdEnter. The instructions in the next steps are commands to be typed into the command prompt.Optional: Install matplotlib (only needed if you’re going to use the Liveplotter).
Command Linepython3 -m pip install matplotlib
Install
odrivetool.Command Linepython3 -m pip install --upgrade odrive
Troubleshooting
If you get
'python3' not recognized as an internal or external command, Python might not be in your PATH environment variable. Python comes with a small script that can fix this. Navigate to the Python install folder (usuallyC:\Program Files\Python<version>\orC:\Users\<YourUsername>\AppData\Local\Programs\Python\Python<version>\) and double-click “win_add2path.py” to run it.See this walkthrough for more tips if the Python installation doesn’t work as expected.
We are going to run the following commands for installation in Terminal.
Install homebrew. You can skip this step if
brew doctoralready returns something likeYour system is ready to brew..Command Line/usr/bin/ruby -e "$(curl -fsSL https://raw.githubusercontent.com/Homebrew/install/master/install)" echo 'export PATH="/opt/homebrew/bin:$PATH"' >> ~/.zshrc echo 'export DYLD_LIBRARY_PATH="/opt/homebrew/lib:$DYLD_LIBRARY_PATH"' >> ~/.zshrc source ~/.zshrc
Install Python 3. You can skip this step if
python3 --versionalready returns something likePython 3.7.0or newer.Command Linebrew install python3
Optional: Install libusb (only needed for Legacy Device Firmware Updates).
Command Linebrew install libusb
Optional: Install matplotlib (only needed if you’re going to use the Liveplotter).
Command Linepip3 install matplotlib
Install
odrivetool.Command Linepip3 install --upgrade pip pip3 install --upgrade odrive echo 'export PATH="'$(python3 -c "import sysconfig; print(sysconfig.get_path('scripts', 'posix_user'))")':$PATH"' >> ~/.zshrc source ~/.zshrc
Troubleshooting
Permission Errors: Just run the previous command in sudo
Command Linesudo pip3 install --upgrade odrive
Dependency Errors: If the installer doesn’t complete, and you get a dependency error (Ex. “No module…” or “module_name not found”)
Command Linesudo pip3 install module_name
Try step 5 again.
Other Install Errors: If the installer fails at installing dependencies, try
Command Linesudo pip3 install odrive --no-deps
If you do this, brace yourself for runtime errors when you run
odrivetool(the basic functionality should work though).
Install Python 3. You can skip this step if
python3 --versionalready returns something likePython 3.7.0or newer. The installation command depends on your Linux distribution. For example on Ubuntu:Command Linesudo apt install python3 python3-pip
If this doesn’t work, see the official download page.
Optional: Install matplotlib (only needed if you’re going to use the Liveplotter).
Command Linepip3 install matplotlib
Install
odrivetool.Command Linepip3 install --upgrade odrive
Set up USB device permissions.
Command Linesudo bash -c "curl https://cdn.odriverobotics.com/files/odrive-udev-rules.rules > /etc/udev/rules.d/91-odrive.rules && udevadm control --reload-rules && udevadm trigger"
Ubuntu, Raspbian: If you can’t invoke
odrivetoolat this point, try adding~/.local/binto your$PATH(see related bug). This is done for example by runningnano ~/.bashrc, scrolling to the bottom, pastingexport PATH=$PATH:~/.local/bin, and then saving and closing, and close and reopen the terminal window.
Start odrivetool
After installation is complete, you can launch the interactive console with
odrivetool
Connect your ODrive and wait for the tool to find it. If it doesn’t connect after a few seconds, refer to the troubleshooting page.
Now you can, for instance, type odrv0.vbus_voltage Enter to display the board’s main supply voltage.
It should look something like this:
ODrive control utility v0.5.1
Please connect your ODrive.
Type help() for help.

Connected to ODrive 306A396A3235 as odrv0
In [1]: odrv0.vbus_voltage
Out[1]: 11.97055721282959
The tool you’re looking at is a fully capable Python command prompt, so you can type any valid python code.
Type odrivetool --help to see what other features are available.
Using odrivetool via CAN
⇒ New in odrivetool 0.6.11. Requires Firmware 0.6.11 or newer (See Firmware Update)
Note
For general advice on CAN wiring, see CAN hardware setup.
You will need a supported USB-CAN adapter (e.g. ODrive USB-CAN Adapter).
Once the adapter is connected to the ODrive and the computer, run odrivetool as usual without any arguments.
odrivetool will automatically detect the adapter and connect to all ODrives on the bus.
By default, it will connect using a baudrate of 1Mbps.
To use a different baudrate, run odrivetool --usbcan 500000 (replace with your desired baudrate).
See also Which baudrate to select?.
odrivetool can be used with any CAN interface that is supported by Linux’s native CAN stack
(known as SocketCAN).
This includes the ODrive USB-CAN Adapter, which most Linux distributions will automatically detect and make available as a SocketCAN interface.
Check which CAN interfaces are available:
Command Lineip link list type can
Bring up the CAN interface you want to use with the desired baudrate (see Which baudrate to select?). Here we’re using
can0at 1Mbps:
Command Linesudo ip link set can0 up type can bitrate 1000000
Run
odrivetoolon the desired CAN interface:
Command Lineodrivetool --can can0The CAN interface must be specified explicitly, otherwise
odrivetoolwill not use to it. This is to avoid interference with potential other uses of the CAN bus.
Using an ODrive USB-CAN Adapter directly
odrivetool can also connect to an ODrive USB-CAN Adapter directly,
without going through the Linux SocketCAN stack. This is the standard use
case for Windows and macOS.
However on Linux, the kernel automatically detects the adapter and claims
it so you need to detach the kernel driver first. See Unbinding from SocketCAN on Linux for instructions.
After that, you can run odrivetool without any arguments and it
will automatically connect to the adapter.
Which baudrate to select?
In the default configuration, the ODrive automatically detects the baudrate of the CAN bus once there is regular bus activity. This means you can select any compatible baudrate on the host side, and the ODrive will adapt to it. For optimal performance, we recommend using a baudrate of 1Mbps. If other (non-ODrive) devices are on the bus or if you have very long cables, you may need to use a lower baudrate.
Commands and Objects
See also: Python Package.
The odrivetool console is a Python console (more precisely: IPython) with a few extras.
The following commands and functions are available:
All built-in Python commands and functions.
ODrives are accessible via
odrv0,odrv1, etc. The attributes on these ODrive objects are defined by the API that the ODrive exposes and can change when you update the ODrive’s firmware. The full API is documented in the API Reference.Additional helper functions, such as
dump_errors(odrv0)are available. More precisely, all members of the moduleodrive.utilsare available.
Below is a quick summary of helper functions. Click on a name to show more details, or visit odrive.utils for a complete list.
|
Prints a summary of the error status of the device on stdout. |
|
Starts the liveplotter. |
Stops the currently running liveplotter. |
|
|
Requests an axis to enter the specified state. |
|
Returns a dict of the form {path: value} containing all properties on the ODrive that have "config" in their path. |
|
Restores the configuration of the ODrive from a dictionary. |
|
Captures a short window of data from the ODrive at its native control loop rate. |
Facility to capture variables from the ODrive at its native control loop rate. |
Multiple ODrives
By default, odrivetool will connect to any ODrive it finds.
If this is not what you want, you can select a specific ODrive.
To find the serial number of your ODrive, run odrivetool, connect exactly one ODrive and power it up.
You should see this:
Connected to ODrive 306A396A3235 as odrv0
In [1]:
306A396A3235 is the serial number of this particular ODrive.
If you want odrivetool to ignore all other devices you would close it and then run:
odrivetool --serial-number 306A396A3235
My ODrive is stuck in DFU mode, can I still find the serial number?
Yes, the serial number is part of the USB descriptors. In Windows you can find it in the Device Manager. In Linux you can find it by running:
(sudo lsusb -d 1209:0d32 -v; sudo lsusb -d 0483:df11 -v) 2>/dev/null | grep iSerial
This should output something like:
iSerial                 3 385F324D3037
iSerial                 3 306A396A3235
Here, two ODrives are connected.
Liveplotter
start_liveplotter() can be used for graphical plotting of
ODrive parameters (e.g. position) in real time. Any variable can be plotted
that you are otherwise able to read like normal in odrivetool.
The plot will open in a new window and you can run other commands while it is open.
matplotlib must be installed to use this feature.
Note
For a better plotting experience, consider using the Web GUI instead.
Note
Some Linux distros (especially Arch Linux) require starting ODrivetool with an additional environment variable for Liveplotter to work properly. If liveplotter crashes for you, try starting odrivetool via: MPLBACKEND=TkAgg odrivetool and then starting liveplotter.
Example
In this example we plot the position of two motors.
To read the position, you would usually type odrv0.axis0.pos_estimate. However this returns the value itself.
When starting the liveplotter, we need to pass in a reference to the property, not its value. We do this by replacing it with _[...]_property.
start_liveplotter(properties=[
    odrv0.axis0._pos_estimate_property,
    odrv1.axis0._pos_estimate_property,
])
Liveplotter Position Plot
Here, both motors are running in AxisState.CLOSED_LOOP_CONTROL while they are being forced off position by hand.
High Rate Capture
To get the best possible performance out of your system, it is important to see what it is doing at a high time resolution.
The ODrive can record a limted window of data at its native control frequency (8kHz) into a circular buffer. Once a capture is triggered, the ODrive stops recording and the buffer can be downloaded and plotted.
In odrivetool, this function is available via high_rate_capture_start()
and HighRateCapturer.
Example
Assume we want to see how the axis responds to a step in input velocity. Assume the ODrive is already configured for basic velocity control.
Enter
CLOSED_LOOP_CONTROLmode.
odrivetoolodrv0.axis0.requested_state = AxisState.CLOSED_LOOP_CONTROL
Send an input step while running a high rate recording.
The input step (
odrv0.axis0.controller.input_vel = 10.0) and the triggering (trigger_and_download_sync()) must happen in quick succession, otherwise the capture window might not contain the time frame that’s of interest anymore. To ensure this, paste the following snippet as a single block intoodrivetooland press enter.odrivetoolodrv0.axis0.controller.input_vel = 0.0 capturer = high_rate_capture_start(odrv0, ['axis0.controller.vel_setpoint', 'axis0.vel_estimate', 'axis0.motor.foc.Iq_setpoint', 'axis0.motor.foc.Iq_measured']) time.sleep(0.5) odrv0.axis0.controller.input_vel = 10.0 data = capturer.trigger_and_download_sync(return_as=np.recarray, t_fmt=TimestampFmt.NANOSECONDS)
Plot the result.
odrivetoolimport matplotlib.pyplot as plt for key in list(data.dtype.fields.keys())[1:]: plt.plot(data['timestamps'] / 1e6, data[key], '.-', label=key) plt.xlabel('Time [ms]') plt.legend() plt.grid() plt.show()
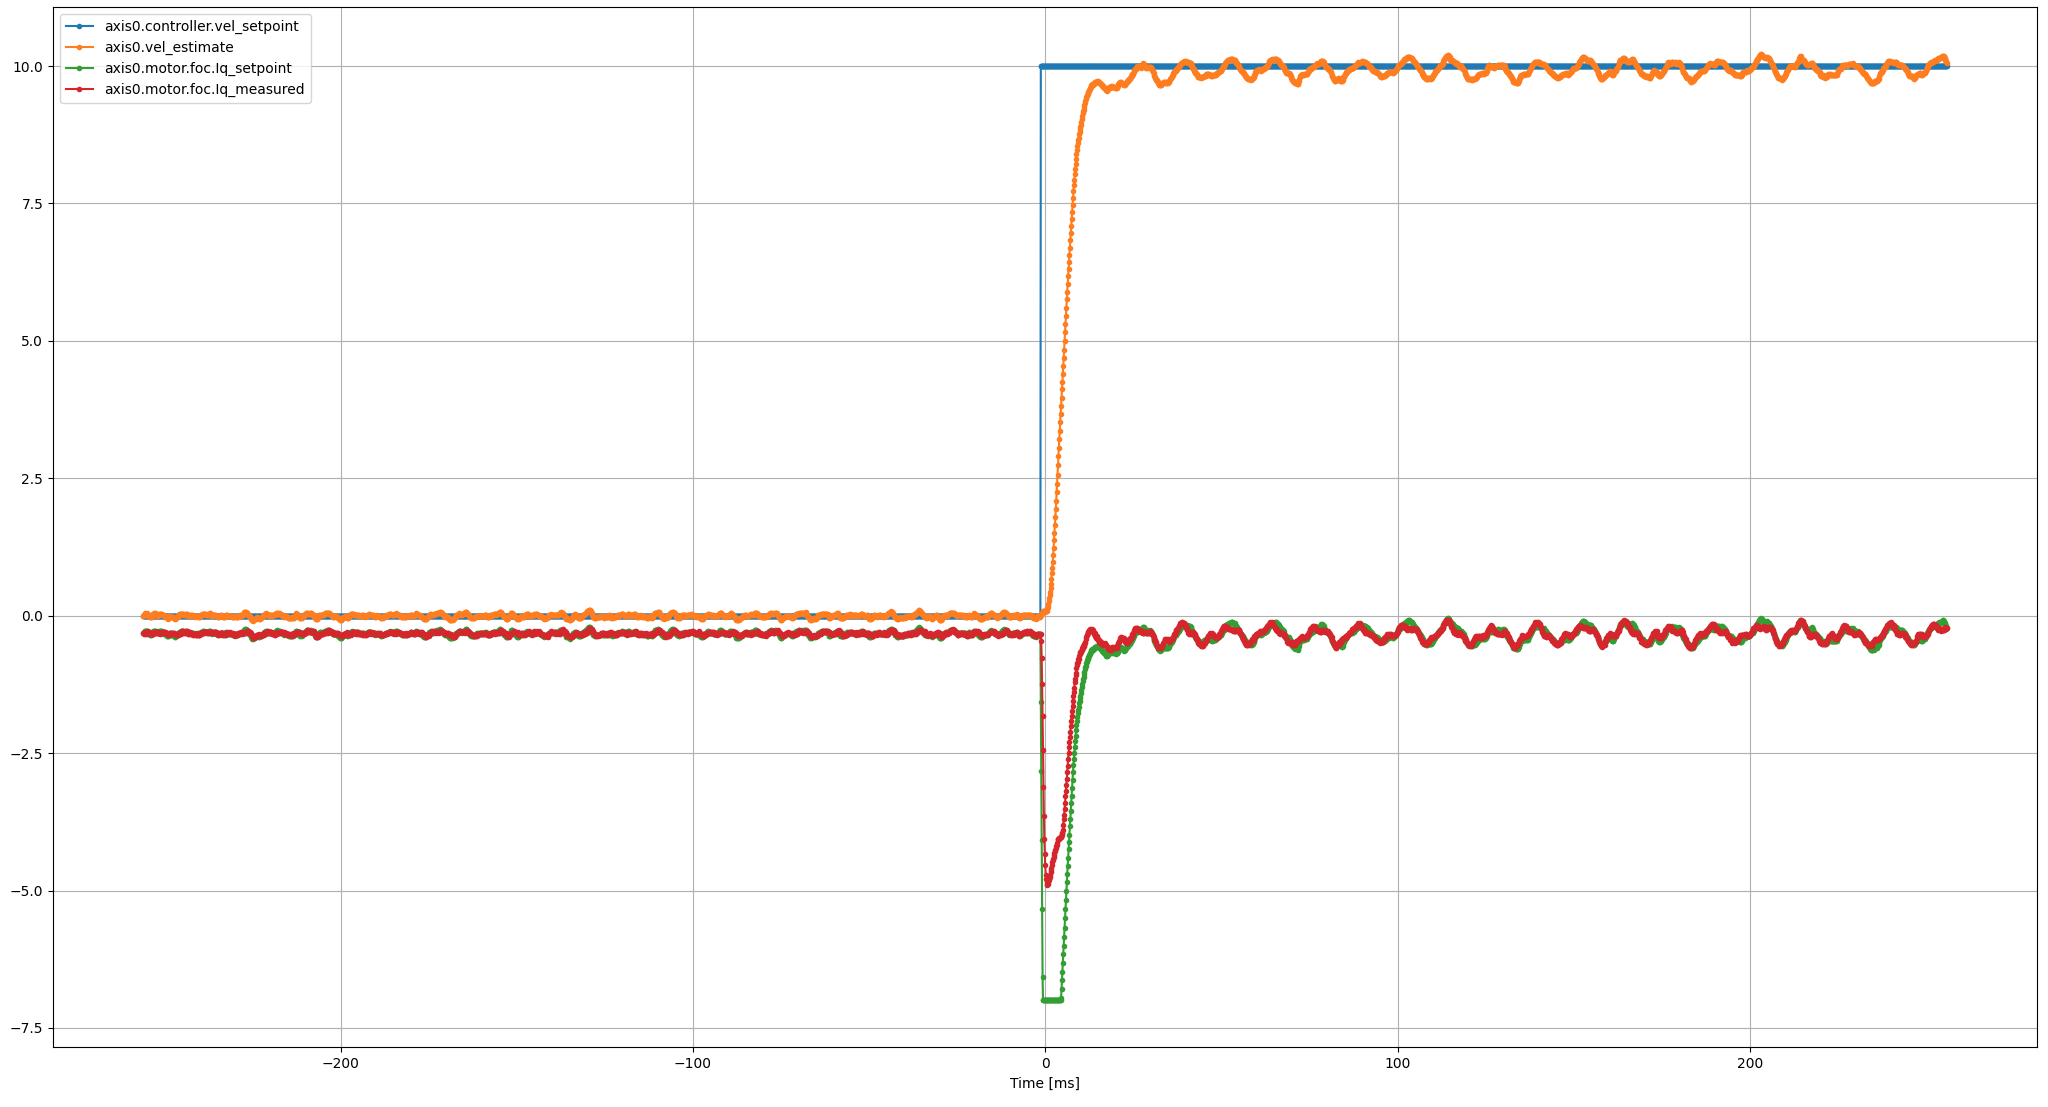
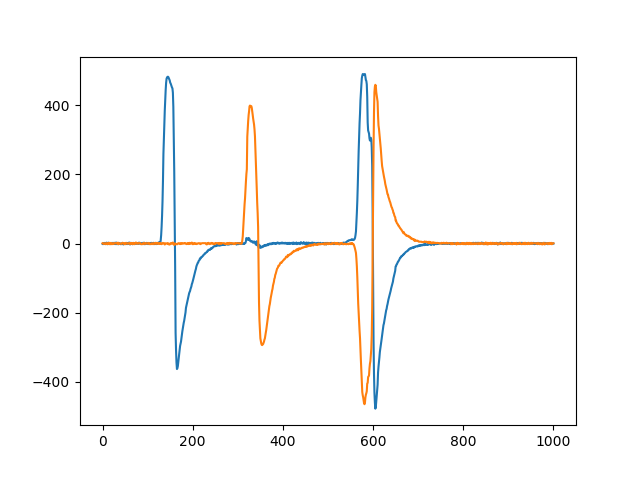
High rate capture of a velocity step response. Click to enlarge.
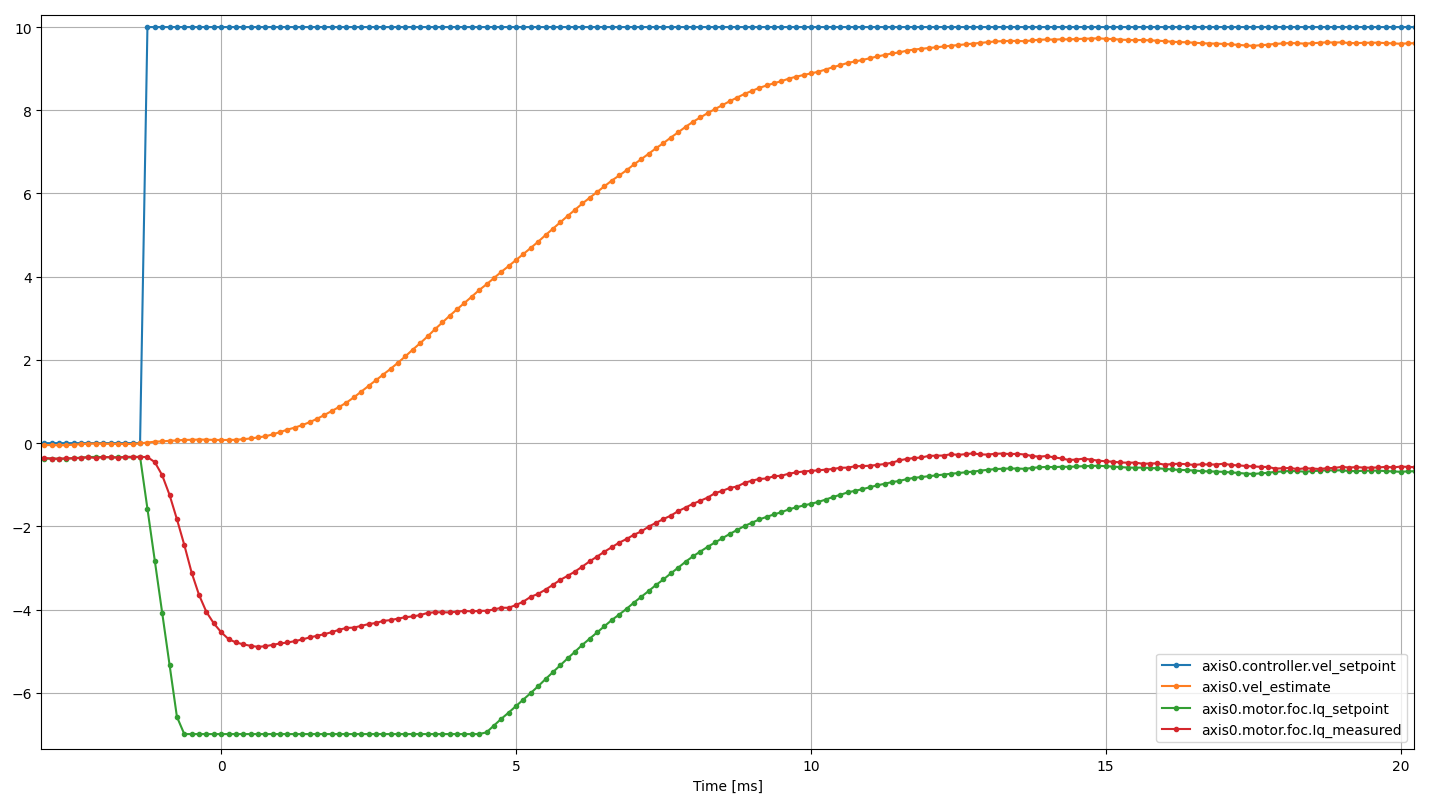
Close-up of the high rate capture. The time 0ms corresponds to the call to
trigger_and_download_sync(), so it is
shortly after the input step.
For more options, such as moving the trigger point, changing the timestamp format etc.,
check out the reference documentation: high_rate_capture_start().
Things to know
For now, this feature requires pre-release firmware. Select the
develchannel when updating the firmware.When the ODrive enters
IDLE, the capture is triggered automatically with a trigger point of 0.98.A maximum of 9 variables can be recorded in one go.
The length of the recording window is determined by a fixed size buffer in the ODrive and depends on how many variables are being captured. For firmware 0.6.12 on ODrive Pro, S1 and Micro:
Number of Variables
Window Length
1 variable
2048 ms
2 variables
1024 ms
9 variables
228 ms
Firmware Update
Configuration Backup
You can use odrivetool to back up and restore device configurations or transfer the configuration of one ODrive to another one.
Note
The encoder offset calibration is not restored because this would be dangerous if you transfer the calibration values of one axis to another axis.
Note
It is not recommended to transfer the configuration between different firmware versions because variables can get renamed
or removed (in which case odrivetool will show warnings) or defaults changed between firmware versions.
After firmware updates it is instead recommended to check the CHANGELOG and manually transfer the settings.
Changelog
⇒ See Python Package Changelog